| Getting started with pic-programming. |
|
This is a beginners guide to flashing/burning/programming PIC processors. It includes building your very own PIC burner/programmer from scratch as well as building your first test setup which can blink a led. This is where you'd wanna go.  click to enlarge... First you'd want to build a PIC programmer. This is the tool which you're going to use to transfer the program code from your PC/Mac to the PIC processor. To do this use the guide made by janson-soft.de. This is the best and most simple PIC programmer schematic. It's really straight forward! Here's the guide: pic-programmer.zip 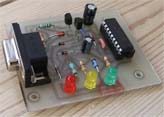 click to enlarge... When you need to program the PIC I'll recommend a ANSI C compiler called PICC. It's not freeware but the demo gives you limited features and is OK to start out with. Please note that not all PIC processors are supported by the demo. To blink an LED in PICC, make an infinite while loop, and use the delay_ms() function and the output_high(PIN_XX) and output_low(PIN_XX) functions. Remember to define the pin you use to output when you're going through the "new project" guide. Do a google search with the name of your PIC processor (ex PIC16F628) and the word datasheet to find a datasheet with pinout referring to the PIC processor you've bought You need a little piece of software to upload the compiled projecty file from your computer to the PIC through your pic programmer. The compiled file has the extention .hex. You should use a tool called IC-prog Here's some things you should read before building your testcircuit. There are two different types of PIC processors. The ones containing a F in their name and the ones containing a C in their name. ex: PIC16F84 and PIC16C84. The F-style processor is flashbased and you can reflash the PIC as many times as you want. The C-style processor is normally a bit cheaper but don't let that fool you. They are a one-shot-wonders. You can only burn them once, and are therefore not suited for testing and developing. Don't buy a C-style PIC!!!! The PIC can run at different clockfrequencies. Some PIC processors has an internal clock you can use as long as precision isen't important. Anything regarding communications and timers should be built with an external clock source. Read more about this here Remember to set the correct clock source in the configuration panel in IC-Prog. The PIC processor can be code protected and write protected. This is allso done in IC-Prog. This should only be used when you really want to protect your code. You cannot unlock the PIC processor once you've code- or write protected it. The PIC programmer consumes a decent amount of power. If you experience writeerrors when flashing the PIC, or if reading from the PIC just returns zeros, then try with another computer. If the LED's of the programmer flickers, it's probably not the programmer which is faulty. Allso remember to install the NT/2000/XP driver found at the IC-prog website if you're using this platform. Consult the helpfile on how to do this. I used the PIC16F84 which dosen't have an internal oscillator. Therefore my testcircuit is a bit more complicated than necesary I have used a solderless breadboard to assemble my testcircuit. This is reccomended since it is much easier to make small changes while testing and debugging. How i did: First build a voltage regulator circuit using an LM7805 voltage regulator (gives a stable +5v). The two outmost rows of holes on my breadboard are designed for input voltage and ground. Wire these rows with the voltageregulator and add a diode to prevent short circuit'ing the board. Hook up the PIC and if needed an external oscillator crystal + caps. Now you add an LED and a suited (ex. 330 ohm) resistor to a output pin of your choice. (Use the PIC datasheet to find what pin number youre using in PICC) Visit http://www.voti.nl/blink/index.html for a much more detailed guide... 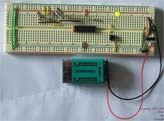
click to enlarge... That's all for now! Thanks for reading, and do contact me if you need help! |